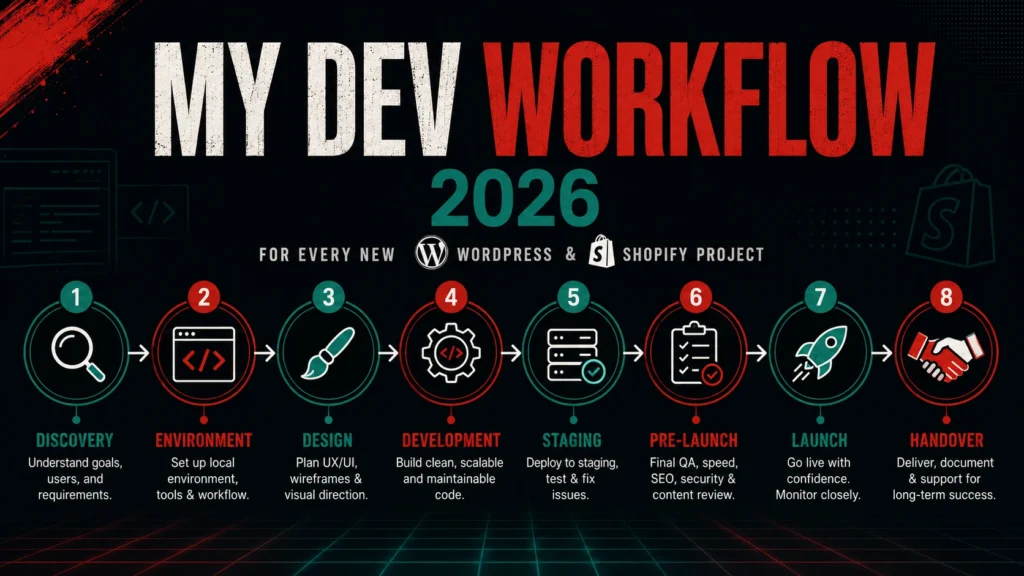
One of the most consistent differences between developers who deliver projects smoothly and developers who are always firefighting is not technical skill — it is process. The technical problems in web development are rarely the hard part. The delays, the scope creep, the “this was working yesterday” moments, the last-minute stakeholder surprises — almost all of those trace back to a missing or inconsistent workflow rather than a missing or inconsistent skill.
After four years of freelance WordPress and Shopify development, I have a workflow I follow on every new project without exception. Not as a rigid checklist I follow robotically, but as a consistent mental model that ensures nothing important gets assumed, skipped, or discovered too late. It covers everything from the first client conversation to the final handover — and this post documents it in full.
If you are a developer building your own process, or a business owner curious what a professional development workflow actually looks like, this is the real thing — not a theoretical ideal.
Phase 1: Discovery — Understanding Before Building
Every project I take on starts with a structured discovery phase before any code is written, any tool is chosen, or any timeline is committed to. This is not optional and it is not just a formality — it is the phase where projects are won or lost before they begin.
The Questions I Ask Every Client Before Anything Else
The goal of discovery is to understand the project deeply enough to scope it accurately, choose the right tools, and anticipate the decisions that will slow things down if they are not made upfront. My standard discovery questions:
- What is the primary purpose of this site? Selling products, generating leads, publishing content, building a community, or some combination — the answer shapes every technical decision that follows.
- Who is the target audience and what do they need to do on the site? A site for technical developers and a site for first-time buyers of a consumer product are built differently at every level.
- What does success look like six months after launch? This question surfaces the real business goal behind the project and prevents building a technically correct site that solves the wrong problem.
- Who will manage the site after launch, and what is their technical level? The answer determines how the CMS is configured, how content editing is structured, and what training is needed at handover.
- Are there existing brand guidelines, design files, or a style guide? Starting development without these is one of the most common causes of costly mid-project redesigns.
- What third-party integrations are required? CRMs, email platforms, payment gateways, booking systems, ERPs — every integration needs to be identified before scope is finalised, not discovered halfway through development.
- What is the content migration situation? Are we starting fresh, migrating from an existing site, or importing from another platform? Content migration is consistently underestimated in project scoping.
- What is the timeline and what is driving it? A hard external deadline (a product launch, a trade show, a seasonal sale) changes how the project is sequenced. A flexible timeline allows for a better-built product. Knowing which one applies from day one prevents misaligned expectations.
Platform Decision
I make the platform recommendation during discovery — not before it. WordPress for content-driven sites, service businesses, and complex custom functionality. Shopify for ecommerce-first businesses where selling products is the core function. The platform recommendation comes from the discovery answers, not from a preference.
Discovery Output: The Project Brief
At the end of discovery, I produce a written project brief that documents the scope, deliverables, platform, integrations, content situation, timeline, and any assumptions or exclusions. This document is reviewed and agreed on before any contract is signed or any development begins. It is the single most important document in any project — not because it prevents changes, but because it makes changes visible and explicit rather than invisible and assumed.
Phase 2: Environment Setup — Building in the Right Place
No code ever goes directly onto a live site. Ever. This is non-negotiable regardless of how small the change is or how confident I am that it will not break anything. Every project starts with a properly configured development environment before a single file is touched.
WordPress: Local Development with Local by Flywheel
For WordPress projects, I use Local by Flywheel as my local development environment. A new Local site takes under two minutes to spin up, runs on a configurable PHP version that matches the production server, includes built-in SSL, and has WP-CLI integrated directly. Every WordPress project starts locally before it touches any remote server.
My local environment setup checklist for every new WordPress project:
- Create a new Local site with the PHP version matching the production host (PHP 8.2 or 8.3 in 2026)
- Install WordPress and configure the admin user with a strong password — never use “admin” as the username, even locally
- Install and activate the confirmed plugin stack for the project — no extra plugins “to try later”
- Configure
wp-config.phpwith debug logging enabled locally:define( 'WP_DEBUG', true ); define( 'WP_DEBUG_LOG', true ); define( 'WP_DEBUG_DISPLAY', false ); - Initialise a Git repository immediately — before writing any project code
- Create a
.gitignorethat excludes WordPress core files, the uploads directory, and any environment-specific config
Shopify: Development Store via Partner Account
For Shopify projects, I create a development store through my Shopify Partner account. A development store is a free, fully functional Shopify environment that behaves exactly like a live store but does not process real transactions. All theme development, app installation, and configuration testing happen on the development store before anything touches the client’s live store.
For theme development specifically, I use the Shopify CLI for local development — it provides hot reloading so changes are visible in the browser instantly without manual file uploading, and integrates directly with Git for version control.
# Initialise Shopify CLI for a
# new theme project
shopify theme init my-project-theme

# Start local development server
# with hot reload
shopify theme dev --store=dev-store-name

# Push theme changes to an unpublished
# theme on the development store
shopify theme push --unpublished
Version Control: Git From the Very Start
Every project — WordPress or Shopify — is under Git version control from the first commit. Not from when the first feature is built. Not from when the client approves the design. From the very first file.
My standard branch structure for every project:
main— production-ready code only. Nothing merges here that has not been tested on staging.staging— the integration branch. Features are merged here first for testing before going to main.feature/feature-name— individual feature branches. One branch per feature or fix, merged into staging when complete.
Commit messages follow a consistent format: a short imperative sentence describing what the commit does, not what you did. Add custom product card section not Added the product card section I was working on. Clear commit messages make the project history readable six months later by someone who was not there when the code was written.
Phase 3: Design Review and Component Planning
Before writing a single line of PHP, Liquid, or CSS, I review the design files thoroughly and build a component inventory. This step is skipped constantly by developers who are eager to start building — and it costs them hours of refactoring later.
Design File Review
I ask for design files in Figma as a standard for every project. The review covers:
- All page templates needed — home, interior, archive, single post, product, collection, 404, search results
- All reusable components across templates — header, footer, cards, hero sections, CTAs, forms
- Responsive breakpoints — how each template and component behaves at mobile, tablet, and desktop
- Interactive states — hover, focus, active, disabled states on all interactive elements
- Typography scale — all font families, sizes, weights, and line heights in use
- Colour palette — all colours defined and named
Any gaps in the design — missing mobile states, undefined interactive elements, missing templates — are flagged and resolved before development begins. Building against an incomplete design spec is one of the most reliable ways to build the wrong thing.
Component Inventory
From the design review, I build a component inventory — a simple list of every reusable UI component the project requires, organised by complexity. This becomes the development task list. For WordPress block themes, each component maps to a block or pattern. For Elementor, each maps to a widget or template. For Shopify, each maps to a section or snippet.
Phase 4: Development — Building in the Correct Order
Development follows a consistent sequence that builds from the most foundational elements to the most specific. Skipping ahead — building a complex feature before the basic structure is solid — creates rework that always costs more time than the shortcut saved.
WordPress Development Sequence
- Theme foundation:
theme.jsonconfiguration — colour palette, typography scale, spacing, and layout settings. This is the design system foundation that everything else inherits from. - Global templates: Header and footer sections, site-wide navigation, and the base page template structure.
- Custom post types and taxonomies: Registered in a site-specific plugin — not the theme — so they persist if the theme changes.
- ACF field groups: Created and synced to ACF JSON for version control. All field groups attached to the correct post types, pages, and blocks.
- Custom blocks or Elementor templates: Built component by component following the component inventory, starting with the most reused ones.
- Page templates: Home, interior pages, archive templates, single post templates — assembled from the components built in the previous step.
- WooCommerce customisation (if applicable): Cart, checkout, account, product templates — applied last because they depend on the global design system established in earlier steps.
- Third-party integrations: API connections, form integrations, CRM connections — configured and tested in the local environment with test credentials before staging.
Shopify Development Sequence
- Theme architecture:
settings_schema.jsonconfiguration — global colours, typography, spacing, and theme-wide settings that power the customiser. - Layout files:
theme.liquid— the master wrapper. Header and footer sections. Global snippets. - Core sections: The most reused sections first — hero, product card, collection grid, announcement bar.
- JSON templates: Page-type templates that assemble sections — index.json, product.json, collection.json, page.json.
- Product and collection customisation: Custom metafield integration, product option logic, variant display.
- Checkout customisation (if required): Checkout Extensibility UI extensions for Shopify Plus projects.
- App integration and configuration: All third-party apps installed, configured, and tested on the development store before going anywhere near the live store.
Code Standards I Follow on Every Project
- WordPress Coding Standards: All PHP follows WPCS — proper indentation, correct hook usage, sanitization and escaping on every input and output
- Prefix everything: Every function, class, hook, and meta key uses a project-specific prefix to prevent collisions with plugins and other code
- Comments on custom logic: Any code that is not immediately obvious from reading it gets a comment explaining why it exists, not just what it does
- No hardcoded strings in templates: All user-facing strings use
__()oresc_html_e()for internationalisation, even on projects that are not currently multilingual - Assets only where needed: Stylesheets and scripts load only on pages that need them — never globally unless genuinely required globally
Phase 5: Staging and Client Review
Once local development reaches a reviewable state, the project moves to a staging environment. Staging is not a formality — it is where real problems are discovered before they become live problems.
WordPress: Staging on a Live URL
For WordPress, I push from local to a staging environment hosted on the production server or a dedicated staging subdomain. I use WP Migrate to push the local database and files to staging cleanly, handling URL serialisation correctly. The staging URL is shared with the client for review with a clear set of review instructions.
Staging configuration checklist:
- SSL enabled on the staging URL
- Search engine indexing blocked via
Settings → Reading → Discourage search engines - Caching disabled on staging so changes are always visible immediately
- Test accounts created at every user role the site supports
- All forms tested end-to-end — submission, notification, and confirmation
- All payment flows tested with Stripe test card numbers
Shopify: Unpublished Theme Preview
For Shopify, I push the development theme to the client’s store as an unpublished theme using Shopify CLI. The client reviews via the theme preview URL — which shows the full store experience without making the theme live. This means clients review against real store data — their actual products, collections, and content — rather than placeholder data.
# Push to client store as unpublished
# theme for review
shopify theme push \
  --store=client-store.myshopify.com \
  --unpublished
Managing Client Feedback
Client feedback during staging is managed in a single shared document — not over email, not in WhatsApp messages, not across three different calls. A numbered feedback list that both parties can reference, with a clear status (open, in progress, done) on every item. This single habit eliminates the majority of “I thought that was fixed” and “I never said that” conversations that derail revision rounds on most projects.
I also set clear expectations about revision rounds upfront. The project brief defines how many rounds of revisions are included. Changes that fall outside the agreed scope are quoted separately and approved before work begins — not absorbed silently and resented later.
Phase 6: Pre-Launch Checklist
Before any site goes live, I run through the same checklist on every project. This is not optional and it is not abbreviated on tight deadlines. A broken live site costs more time to fix than the pre-launch checklist takes to run.
WordPress Pre-Launch Checklist
- SSL certificate installed and all URLs force HTTPS
- Search engine indexing enabled (Settings → Reading — uncheck “Discourage search engines”)
- Caching plugin configured and tested
- All plugins updated to latest versions
- Admin username changed from “admin” to something non-obvious
- Two-factor authentication enabled on all admin accounts
- Login attempt limiting configured
- UpdraftPlus configured with daily automated backups to off-site storage
- Google Analytics / GA4 tag firing correctly — verified in GA4 Realtime
- Google Search Console property created and sitemap submitted
- All forms tested in production — notifications landing in the correct inbox
- PageSpeed Insights score checked on mobile and desktop
- 404 page styled and functional
- Favicon set correctly
- All pages reviewed for broken images, layout issues, and typos on mobile
Shopify Pre-Launch Checklist
- Custom domain connected and SSL active
- Password protection removed from the storefront
- Payment gateway configured and tested in live mode with a real test transaction
- Shipping zones and rates configured for all target markets
- Tax settings reviewed for all selling regions
- Email notifications customised — order confirmation, shipping, refund emails all reviewed
- GA4 and Meta Pixel firing correctly — verified in debug mode
- Google Search Console connected and sitemap at
/sitemap.xmlsubmitted - All product images checked — correct dimensions, no missing images, alt text set
- Checkout flow tested end-to-end — add to cart through payment confirmation
- Mobile checkout tested on a real device
- PageSpeed and Core Web Vitals checked on the published theme
Phase 7: Launch and Post-Launch
The Launch Itself
I never launch on a Friday or the day before a public holiday. If something goes wrong — and occasionally something does — you need to be available to fix it immediately. A site that breaks over a weekend or a holiday weekend costs the client real money in lost traffic and sales, and costs you a working weekend. Launch on a Tuesday, Wednesday, or Thursday morning when you have a full working day ahead of you.
For WordPress, the launch sequence is: push production-ready code from staging via WP Migrate, update DNS to point to the production server, verify SSL, enable indexing, flush cache, confirm the live site is rendering correctly, and submit the sitemap to Google Search Console.
For Shopify, the launch sequence is: remove password protection, publish the approved theme, connect the custom domain, verify SSL is active, confirm payment processing in live mode, and verify all tracking pixels are firing on the live domain.
Post-Launch Monitoring (First 48 Hours)
After every launch I monitor actively for 48 hours. This means checking Google Analytics for unexpected traffic drops, checking Search Console for crawl errors, testing the most critical user flows (contact form, purchase, account creation) on the live site, and being reachable for the client if anything comes up. Most post-launch issues — if there are any — surface within the first 24 hours.
Phase 8: Handover
Every project ends with a structured handover, not just a “here’s your login” message and a final invoice. Handover includes:
- Credentials document: All login URLs, usernames, and passwords for WordPress or Shopify admin, hosting, domain registrar, Google Analytics, Search Console, and any third-party services configured during the project — stored in a shared password manager entry, not in an email.
- Recorded walkthrough: A screen-recorded video showing the client how to perform the most common day-to-day tasks — adding a blog post, updating a product, changing a homepage image. 15–20 minutes, recorded in Loom, shared with a permanent link.
- Technical documentation: A brief document covering what custom code was built and why, what the update process looks like, and who to contact for each service if something needs attention.
- Maintenance recommendation: An honest recommendation about whether the site needs an ongoing maintenance retainer and what it covers — not a sales pitch, a genuine assessment based on the site’s complexity and the client’s technical confidence.
Why I Follow This Workflow on Every Project — Even Small Ones
The most common pushback I get on this workflow is from clients who want to skip phases on “small” projects. Just update the theme directly on the live site. Skip the staging step for a small change. Handle the brief verbally instead of writing it down.
My answer is always the same: the phases exist because of the times they were skipped and something went wrong. The brief exists because of the scope dispute that arose without one. The staging environment exists because of the plugin conflict discovered on a live site at 11pm. The pre-launch checklist exists because of the form that was never tested and never sent a notification for the first three days after launch.
A consistent workflow is not bureaucracy. It is the accumulated cost of every lesson learned from not having one.
At ArshadWebStudio, this workflow runs on every project we take on — from a small business WordPress site to a complex Shopify store build. If you need a developer who brings structure and predictability to your project from day one, get in touch today.
About the Author
Arshad Shah is a freelance WordPress and Shopify developer at arshadwebstudio.com, specialising in custom WordPress development, WooCommerce, Shopify theme development, and performance optimisation. He has delivered projects for clients across the US, Canada, Australia, and the GCC over four years of freelance practice.
Comments
No comments yet. Be the first to share your thoughts!
Leave a Comment